Use MAME’s debugger to reverse engineer and extend old games
For the Church of Robotron’s installation at Toorcamp 2012, we needed to be able to trigger physical events when game events happened in Robotron 2084. A quick summary for context:
We had an Altar that contained a Linux box that ran MAME and Robotron 2084
We had joysticks that acted as HID devices
Player would kneal down and play the game. As events happened in the game (player death, human death, lasers firing), we would trigger physical events.
We choose to use MAME’s debugger to detect game events and notify other pieces of software when they happened. This is a quick tutorial for others (and a reminder to ourselves) if you’re interested in doing similar things. We’re going to find out how to detect player death!
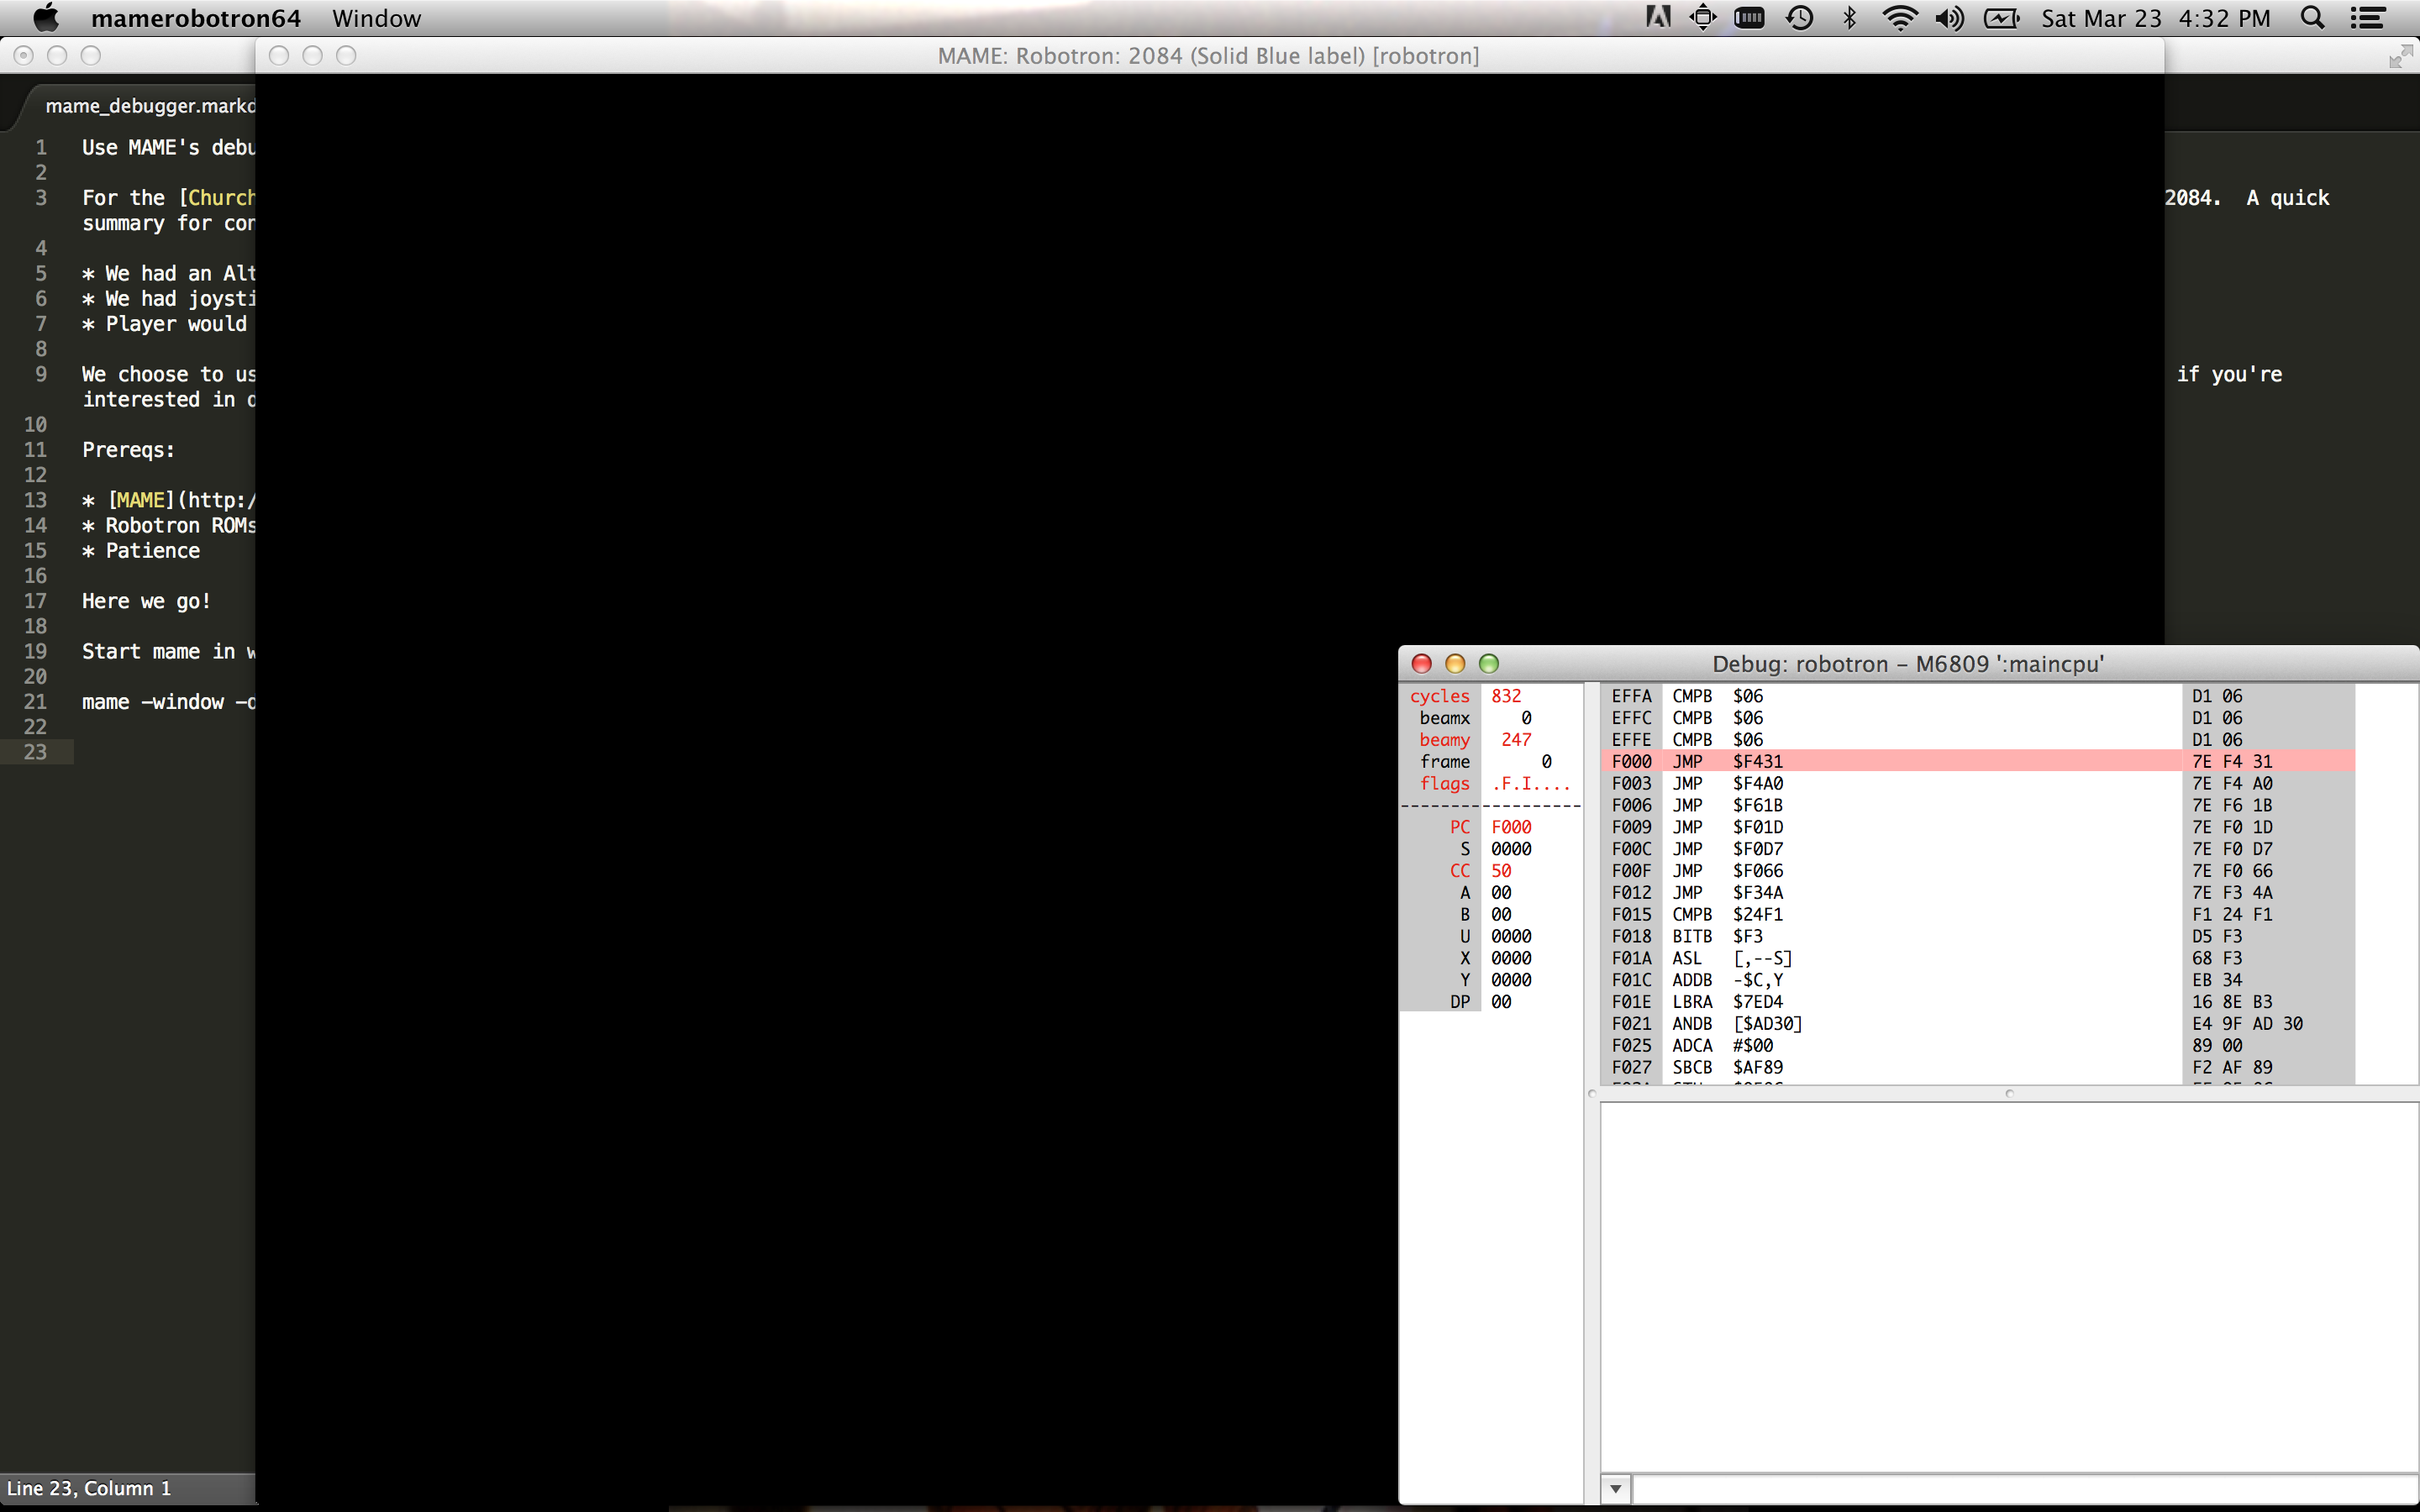
Start mame in windowed mode with the debugger active:
mame -window -debug robotron
You’ll see two windows appear, one is the emulation, the other is the debugger window. You can type “help” at the console and get good documentation on the debugger capabilities. You can also click on the down arrow to access a menu that allows you to run the emulation and later pause it at different points.
Memory dump
The first thing to do to find the memory location of the number of lives the player currently has. One way to do this is to take advantage of other peoples work. ;) Sean Riddle has a great site with a lot of this information already available! The other way is the manual way. Let’s do that!
Start the game by hitting F5
Start playing a game, by hitting 5 to drop a coin, and 1 for one player game.
Pause the game by hitting F8
In the debugger console, type “Help Memory”
Ah, nice, there’s a dump program memory command. Type: “dump lives3.txt,0,0xFFFF”
Press F5, then click on the emulation screen
Hit F2 to access the Operator Screens of Robotron.
Hit F2 until you see “Game Adjustment”
We’re going to change the default number of lives to 5 and see if we can find the difference in the dump.
Press “D” to go down to “Turns Per Player”
Press “I” to change the number of lives to “5”
Press F2
Reselect the debugger screen
Press F8 to pause
Press the Down Arrow, Select Reset, then Hard
Start playing a game, by hitting 5 to drop a coin, and 1 for one player game.
Let the game get to the main screen, then pause the game by hitting F8
Type “dump lives5.txt,0,0xFFFF”
Now we have dumps of the game with 5 lives and 3 lives as the default. Let’s use a diff tool to see what changed in memory! On OSX, you can use Filemerge or standard old “diff”. Scanning through the differences, we don’t see anything that correlates to 5 lives and 3 lives. But we do see two spots that seem to correlate to 4 and 2 lives:
2722,2727c2722,2727
< AA60:  18 07 FF 06 5F 04 1D AA 58 39 CD 02 00 00 00 00  ...._...X9......
---
> AA60:  18 07 FF 06 43 03 E9 AA 58 39 CD 04 00 00 00 00  ....C...X9......
Type “help watchpoints”, a Watchpoint will cause program execution to stop whenever a memory address is written to or read from.
Find out more info on setting a watchpoint by typing “help wpset”
Let’s set our watchpoints
Type “wpset 0xAA6B,1,w” This will set a watchpoint that is triggered whenever our first memory address guess is written to
Type “wpset 0xBDEC,1,w”
Run the game
Assuming you didn’t die, you’ll notice the first watchpoint has been hit and it doesn’t have anything to do with player death. Lets clear that one.
Type “wpclear 1”
Start the game again, and play hard until the Mutant Savior dies.
You’ll notice the second watchpoint is triggered!
We’ve found the memory location for player lives! We can also take note of the instruction pointer address. It’s at 27AC, let’s set a breakpoint here.
Setting breakpoints
Type “bpset 0x27AC”
Type “wpclear”
Continue playing. You’ll notice the breakpoint is hit for every player death except the last one. That’s a bummer! Let’s walk up the stack and figure out a better spot. On some CPU types, you can do just that, but with the 6809 that’s powering Robotron you can’t. So we’ll turn the trace file, run the game until we hit our breakpoint, and then close everything. We can step back up from the bottom of the file and see if there are interesting addresses to set breakpoints on.
Trace file
Type “trace trace.txt”
Start a game and die
In the debugger type “traceflush”
Then type “trace off”
Open the trace.txt file in an editor. Go all the way to the bottom. You’ll see a nice trace with repeated blocks called out. I use these blocks as starting points for new breakpoints. If you scan up the file, you’ll see repeated addresses of DC56. Skip above those, they’re not interesting. We want to find the first branch of code that doesn’t repeat. Just scanning here are the addresses that seem interesting to me:
0xD676, 0xD8BC, 0xD1ED, 0x30FE
Let’s set some breakpoints:
Type “bpset 0xD676”
Type “bpset 0xD8BC”
Type “bpset 0xD1ED”
Type “bpset 0x30FE”
Start running!
You’ll notice D1ED gets triggered alot, so disable that one with the “bpclear (breakpoint number)” The same thing happens to D8BC and D676. But, 0x30FE seems to work!
Summary
I hope this helps people get used to the MAME debugger. After you have this information, you may want to do something with it. We choose to broadcast game events over UDP. You can see how by looking at our Github repo here.
Party House is a projection mapped dollhouse that was quickly thrown together for the
DorkbotPDXOpen Mic Surgery event. It was written in a few days using the Cinder library. The source code is available here: PARTY HOUSE REPO.
It was super fun to perform. It wasn’t a complex or hard thing to do, but sitting up on stage pumping my fist and hitting space bar over and over again to the beat was fun. I’d definitely like to do more of this kind of “work”.
I had originally followed this Madmappertutorial on mapping a building with madmapper and creating a video to go along with it in After Effects. It was a great introduction. I ended up running into problems in my case because the doll house had lots of overhangs and different planes to work with. Maybe if you’re projecting on a huge building, the building dwarfs the projector by enough that you can treat it as one plane. But in this case, I had to create a bunch of planes to make everything line up nicely.
This is also the first time I’ve used After Effects at all. It was nice to just make some videos and them layer them on the fly during my set. I definitely want to spend more time learning After Effects for future projects.
I ended up writing my own software to do the mapping because I’m a hacker and just wanted to. The code isn’t that great, but I do think the EditorViewport and ControlPoint classes are nice enough to re-use in future projects. I also updated the code to use the newest branch of Cinder, so it now supports multiple windows. It was also fun to start using C++11 features.
The Church of Robotron is a future looking group that is attempting to save the last human family. We did a large pop-up church installation at Toorcamp 2012. It had the following features:
During gameplay Jacob’s Ladder and Sparker were running
Fog machine randomly triggered
Lasers fired in real life when enforcer shots were fired in game
Rotating flapper near player hands spun when humans were killed by Robotrons
Animated gif of your face at time of death in game which was displayed on a leaderboard in the other room.
Bright LED flash on death, this allowed us to get a decent picture from the webcam on death and added to the players disorientation on death
Kneeler base which detected players and controlled lights.
Readerboard which displayed top player and witty statements
Randomly shuffling sermon videos
Lit totem pole
Reading room which contained stickers, chick tract, and a zine.
I hacked MAME to expose debugging events (breakpoints, memory watchpoints) to clients via sockets. I also did some reverse engineering of the ROM to find out game events (deaths, high score, etc). To do this, I built upon the work of the great Sean Riddle. I also used OpenCV to capture the players faces when they died which were posted to the high scores page. We had about 15 people working on various pieces of the project. It was great to see it all come together and it was great to see people’s reaction to it!
Source code is available here. More tech details will be written at some point. I’m planning to write a quick post about mame hacking at some point soon.
“This is how we Disappear” is a 25 minute dance performance created by the BOBBEVY dance company. I used a lot of random technologies: Cinder, Microsoft Kinect, libfreenect, OSC, and Control to create realtime dancer reactive visuals to go along with the performance. We performed it quite a few times and my favorite time was at Hollywood Theatre as part of Experimental Half Hour. It was great to see the graphics projected so huge!
I’ve learned quite a bit about what’s required to do visuals for a performance from this project. It’s definitely influenced everything I’ve done afterwards. I’m hoping to do more of this type of work in the future.
Some post-mortem notes:
Using the Kinect is a performance space is a pretty harrowing experience. If there’s a lot of reflection or IR noise in the room, the Kinect can just die. I think there are some tweaks you can do in libfreenect to allow one to continue to get data, but it’s likely to be too noisy to work. I ended up creating a fallback that allowed me to “draw” the dancers with my figures with a Control sketch. But that method isn’t ideal.
I initially triggered everything with keyboard keys, but it became hard to remember what did what after a while (even for a powah user like myself). Have an iPad user interface was much nicer and allowed the BOBBEVY crew to run the show themselves when they performed in Milwaukee. In theory, this would also let me trigger the cues far from the computer which would give more options for where the computer and Kinect go. In practice, the UDP packet loss when doing Adhoc networking seemed to high to rely on this. It’d be nice to have a TCP transport as an option in the future.
I also added Bonjour discovery to everything, this made it much much easier to get everything configured before a show. I recommend this to people doing multi-machine work.
I created the initial firmware for the Missing Link. It’s an OSC receiver that outputs MIDI. The purpose is to hook up OSC clients such as TouchOSC or Control to older synths. The source is available here.
Read below for my post mortem notes.
This was my first “large” microcontroller project. It consisted of the following pieces:
WIFI module
MIDI in/out ports
USB in (used to upgrade firmware, provide power, and did USB midi)
Was able to route between all of the ports. Wifi->USB Midi or normal MIDI and all permutations.
Software wise we used the following:
Arduino libraries (ended up stripping this down alot to fit the ROM space we had)
Two libraries by my friend Alex: a MIDI library focused on microprocessors, and a bootloader that uses sysex as a data transport.
uIP a tiny TCP/IP stack for microcontrollers, this was fun to hack on!
By far, the hardest pieces to get working was communication channels. First, getting I2C working between the PIC and the AVR we used was hard to get reliable. It was hard to even get working initially! I learned the hard way that people interpret I2C address differently. It’s best to spam them all.
Secondly, getting the USB midi code working well was a challenge as well. But it was fun to dive in and learn about USB.
Overall, I learned quite a bit from this project. If I were to do it again, I’d probably not use the Arduino prototype code we started with and go with straight C. The current codebase is a combination of different approaches. But as with a lot of projects, we were working under time constraints.
I gave a class on using Processing to create simple graphics. Also quickly “covered” using the OpenCV addon to detect faces. Notes, slides, etc are available here.
It was the first time I’ve taught a class in quite a while. I got a fairly positive response (from my friends, so they have to be nice to me!). I think I did a good job setting up mini-goals that took 20-30 minutes to accomplish. The idea was to give everyone little victories quickly so they’d be motivated to stick around and conquer more.
I actually haven’t done too much rendering work in the last six to eight months. I’ve been doing a lot of game prototyping. Two prototypes have been put to the side for now and I’m working on a third with a couple of folks. I’m just going to dump out some random snippets I’ve learned through that process.
Sound is a very important cue for debugging! While working on a kart racing prototype I was able to feel the kart slide much easier when hearing it then when looking at the visual debugging cues we had set up. Another spot where sound made it easier to debug behavior is state changes. If you’ve got some bug where state changes happen really fast, they may not make the player respond visually. But if it’s triggering snippets of sound on state change you’ll know something wacky is going on.
Update order matters. This is something I knew about before, but it doesn’t hurt to repeat it. In this situation I had a bunch of force constraints that where always updated from one side to the next, eventually the system developed a “lean” and I couldn’t figure out why for a while. I changed it so that it updated one corner, then the opposite corner and so on and the lean disappeared.
More to come once I remember them. ;)
I’m also thinking about submitting a talk for GDC10. It should be a fun topic to flesh out, I hope it all works out.
Just a quick link post today. Here’s a video of the lighting system I’ve worked on with Pat Wilson and Tom Spilman. I’m mostly responsible for the dark pixels in the video. ;)
Also, I got a new personal best score at Robotron today: 624k. I’m slowly inching up to a million.